There are all sorts of reasons why this is a good idea. Not least because you can version control, unit test and tie into your CI system any existing database.
How many times have you found inconsistencies between a test and live database, not known which one is right and been unsure who to ask on your team? In my experience, especially in smaller teams with no DBA, this happens a lot and people do bad things like edit the live database directly (“Hmmm, according to the query plan I need to add an index. I’ll just do that now.”).
By creating a SQL Server project using SSDT
- You will know exactly who changed what and when.
- You can fail a publish if database drift is detected (ie the database you are publishing to is different from the last time you published because someone changed something directly).
- You can create unit tests with standardised data that run against a fresh database.
- You can track database refactoring (ie changing a column name) so that tables are not dropped and rebuilt when published.
- You can fail a publish if data loss will occur.
- You can fully automate deployment to multiple servers and bring them all to a standard level regardless of their current version.
So much good stuff!
Here’s how you do it.
First, make sure you have the latest version of SSDT.
Create the project
- In Visual Studio, select File / New Project.
- Under Templates. click ‘SQL Server’ and choose ‘SQL Server Database Project’
- Name your project according to the database you are importing and also name your solution, then click OK.

Import your database
- Right click the project you just created and select Import, then Database
- Select your database from the Source Database Connection dropdown list, or use the New Connection button to add it.
- In addition to the default Import Settings that are selected I usually also select ‘Import Database Settings’ so that the correct database version is chosen in the project properties. Otherwise you can usually leave everything else as is.

Check your folders and files
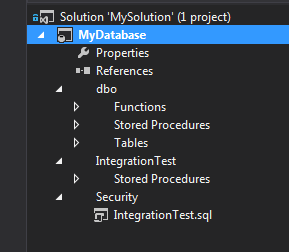
At this point you will have a folder structure based on the database schema – if you only use dbo then you will only see that, otherwise you will see a folder per schema and an additional security folder where sql for creating your schemas has been put. (This is also where you put sql for new schemas) Here you can see that my database has two schemas – dbo and IntegrationTest. SSDT also separates out your functions, stored procs and tables. In the Security folder you can see the sql for creating the IntegrationTest schema.
If there is anything missing at this point you may want to check the import settings. You can always delete all the added files and folders and do the import again.
Build and be happy!
Right click your project and select Build.
- If there are no external references the project will build and create a dacpac. This will be saved in your bin directory in the appropriate configuration folder.
- If there are external references required you will need to add them. I have blogged how to do this here.
You can also add static data such as lookup tables or date dimensions and again I have blogged about this here.
We are now at a stage where you can version control your database and to publish it to a particular server you just need to right click the project and select ‘Publish’. Note that there are several options when publishing and you can create profiles for different servers. I have blogged about how to do that here.
Good luck!


 RSS – Posts
Trackbacks for this post